5주차 - javafx 이벤트 (3)
2022. 9. 4. 20:54ㆍJava/javaFX & Scene Builder
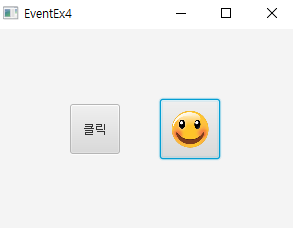
이번 코드에서 해볼 것.
01. 버튼을 만들자.
02. 버튼에 이미지를 넣어보자.
03. 버튼이 눌렸을 때, 클릭이 풀렸을 때에 각각 padding 을 바꾸는 이벤트를 넣어보자
아래는 코드
import javafx.application.Application;
import javafx.geometry.Pos;
import javafx.scene.Scene;
import javafx.scene.control.Button;
import javafx.scene.image.ImageView;
import javafx.scene.layout.HBox;
import javafx.stage.Stage;
public class EventEx4 extends Application{
	@Override
	public void start(Stage primaryStage) throws Exception {
		Button button1 = new Button();
		button1.setText("클릭");
		button1.setPrefSize(50, 50);

		Button button2 = new Button();
		ImageView image = new ImageView("/img/smilerere.png");
		image.setFitHeight(40);
		image.setFitWidth(40);
		button2.setGraphic(image);

		button1.setStyle("-fx-padding: 10 10 10 10");
		button2.setStyle("-fx-padding: 10 10 10 10");

		button1.setOnMousePressed(event -> {
			button1.setStyle("-fx-padding: 15 10 10 10");
		});
		button1.setOnMouseReleased(event -> {
			button1.setStyle("-fx-padding: 10 10 10 10");
		});

		button2.setOnMousePressed(event -> {
			button2.setStyle("-fx-padding: 12 10 8 10");
		});
		button2.setOnMouseReleased(event -> {
			button2.setStyle("-fx-padding: 10 10 10 10");
		});

		HBox box = new HBox();
		box.getChildren().addAll(button1, button2);
		box.setAlignment(Pos.CENTER);
		box.setSpacing(40);

		primaryStage.setTitle("EventEx4");
		primaryStage.setScene(new Scene(box, 300, 200));
		primaryStage.show();

	}
	public static void main(String[] args) {
		launch(args);
	}
}

차이를 조금만 줘서 눈에 확 보이지는 않지만 padding 값이 바뀌어서 눌렸을때 클릭하는 느낌을 준다.
사용자 입장에서는 이런 소소한 변화가 좀더 동적인 프로그램인 것처럼 느껴질것같다.
'Java > javaFX & Scene Builder' 카테고리의 다른 글
| 5주차 - javafx AnchorPane (0) | 2022.09.04 |
|---|---|
| 5주차 - javafx 이벤트 (4) (0) | 2022.09.04 |
| 5주차 - javafx 이벤트 (2) (0) | 2022.09.03 |
| 5주차 - javafx 이벤트 (1) (0) | 2022.09.03 |
| 5주차 - javafx (0) | 2022.09.03 |